In order for the link between Testersuite and JIRA to work properly, some settings also need to be done in JIRA. Below is an explanation of the settings you need to do in JIRA.
Supported Jira Project Types
In Jira, a distinction is made between “company-managed” and “team-managed” projects. The Testersuite integration works for company-managed projects. This is because these projects can share statuses and workflows with one another, unlike team-managed projects. As a result, you can use the integration for multiple Jira projects, provided they are company-managed. The projects you want to use for the integration must implement the same workflow, or at least use the same statuses in their various workflows. Statuses and workflows can be configured in Jira via:
- Settings -> Issues -> Statuses
- Settings -> Issues -> Workflows
Create an integration user
Create a user (via https://id.atlassian.com/signup for Jira Cloud) and grant this user access to your environment.
Make sure this user has at least the following permissions:
- Browse Projects
- Manage sprints
- Assignable User
- Assign Issues
- Close Issues
- Create Issues
- Delete Issues
- Edit Issues
- Link Issues
- Modify Reporter
- Move Issues
- Resolve Issues
- Schedule Issues
- Transition Issues
- Add Comments
- Edit All Comments
- Delete All Comments
- Create Attachments
- Delete All Attachments
Generate an API key
If you use JIRA Cloud, you'll need an API key. This must be generated by the JIRA user account used to log in. Here's how it works:
- Go to https://id.atlassian.com
- Log in with the atlassian account (use the email address associated with the username entered in Testersuite)
- On the left side click on API tokens
- Click on Create API token
- Enter a name (e.g. 'Testersuite')
- Copy the API key generated and paste it in Testersuite in the JIRA API key/password field
More information on using API tokens in JIRA can be found here.
Creating a Webhook in JIRA
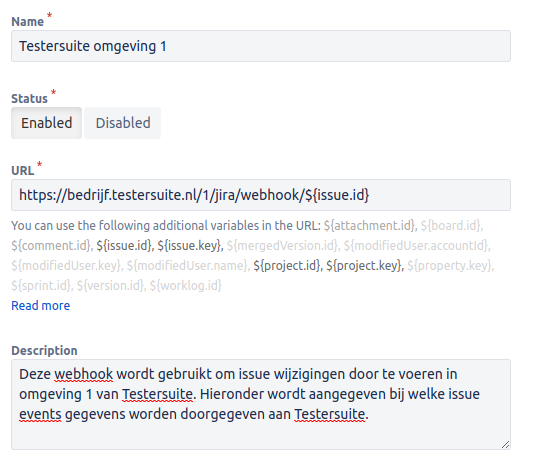
Once the integration with JIRA is set up, changes made to requirements and defects Testersuite are Testersuite reflected in the corresponding user stories and issues in JIRA. If changes made in JIRA also need to be reflected in the Testersuite and defects a webhookmust be created in JIRA. Here’s how it works:
- In your JIRA environment, go to Settings -> System -> WebHooks.
- Create a new WebHook
- Enter the following URL: https://company.testersuite.nl/X/jira/webhook/${issue.id}
- In the " Company " field, enter your Testersuite
- Op de plek van de X voer je het ID in van de Testersuite omgeving waar je mee wilt verbinden. Wil je bijvoorbeeld met omgeving 2 verbinding maken, dan wordt je URL https://bedrijf.testersuite.nl/2/jira/webhook/${issue.id}
- Click the "Generate secret" button and copy the secret value to your clipboard. Enter this value Testersuite the "Jira webhook secret" field Testersuite the integration settings in Testersuite .
- Under Issue, check: updated, deleted
- Under Attachment tick: created, deleted
- Under Comment tick: created, updated, deleted
- Leave Exclude Body set to No (unchecked).
- Save the WebHook
- Do you want to connect the same JIRA site to multiple Testersuite environments? Then create a separate webhook for each Testersuite environment in which you want to use the link.
LET OP: Maak je gebruik van Jira Data Center 10 of hoger, dan wordt het “$” teken in Jira variabelenamen niet mee ondersteund. Gebruik in dat gevoel als webhook URL https://bedrijf.testersuite.nl/X/jira/webhook/{issue.id}
Optional: Sharing a Single JIRA Environment with Multiple Testersuite Testersuite
If you have a single JIRA environment that needs to be used by multiple Testersuite , and you want to ensure that one customer cannot view another customer’s projects, you can use the setup described below. Testersuite user permissions in JIRA.
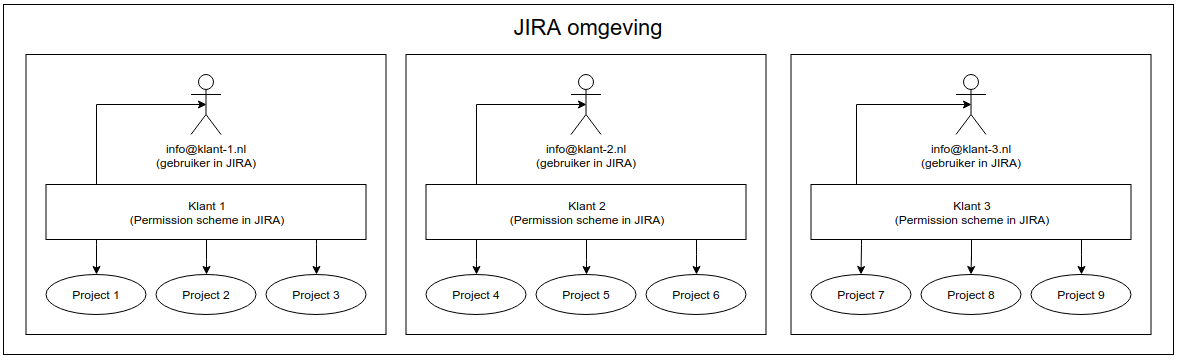
- In JIRA, create a user (for each client) and invite them to your JIRA environment
- Create a Permission scheme in JIRA (for each client).
- Go to Jira Settings -> Issues -> Permission schemes
- Copy the default permission scheme and give it the name of the customer
- Click on Permissions behind the Permission scheme you just created.
- Click Remove behind the Browse Projects permission and remove everything
- Click Edit behind the Browse Projects permission -> Show more -> Single user -> Select the user you created for the client (and an administrator/group if necessary)
- In JIRA, link a project to a customer/permission scheme (for each project)
- Click on Projects and click through to a desired project that you want to make visible to that client
- Click on Project settings -> Permissions -> Actions (top right) -> Use a different scheme -> Select the client here (permission scheme)
- Continue setting up in Testersuite with data from the user that has just been created